Ace Freely
Effect:
This is a killer four ace production. The deck is spread to show that all the cards are face-down. Then the magician cuts the cards, and suddenly two Aces appear.
Then the cards are spread face-down again, but one Ace has magically turned face-up. The three Aces that have appeared are spread face-down on the table. The deck is given to a spectator.
Both hands are shown empty, then both hands wave over the three tabled cards, and the fourth card just suddenly appears on the table with the other three. This is some powerful stuff.
Necessary Moves:
In order to do this effect, you will need to be able to do a handful of utility sleights. Fear not if you are not schooled in the ways of coin prestidigitation, for I will lead you grasshopper. Here’s the list of moves:
- Double Undercut Card Control
- Slip Cut
- Braue Reversal
- Brad Gordon’s Blip
- The Anti-Vanish
If you are already familiar with these, you will still want to read them, because I’m using modified version of each move. I will explain each move first; then we will move on to the performance where we tie all of the moves together.
Double Undercut Card Control:
This is a simple method to move a card, or a stock of cards, from the top of the deck to the bottom of the deck without disturbing the rest of the pack. In our case, we want to control one card to the bottom. For now, it doesn’t matter what that card is; just look at the top card of the deck; that will be the card we are controlling. By the way, I know that your card that is on the top of your deck is the Five of Spades. I’ll teach you how I did that later.
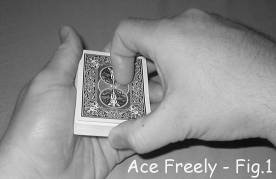
Hold the deck in the left hand in dealer’s grip while holding the cards from above with the right hand in Deep Overhand Grip. With the right thumb, get a thumb break above the top card. Figure one shows the position your hands should be in right now.
Now with your right thumb riffle up the back of the deck and break the deck at about the half-way point (see fig. 2).
You will use your left hand to cut this “broken” packet from the bottom to the top of the deck. Figure three shows your position after this cut. Now cut the rest of the cards, below the break, to the top of the deck, and you will now have moved the top card to the bottom of the deck.
Slip Cut:
No, this has nothing to do with scissors and lady’s apparel. This is a move that is used to cut the top card into the center of the deck while looking like you gave the deck a legitimate straight cut (as opposed to a crooked cut).
However, we are going to use this in a slightly modified fashion. What follows is a description of the modified version. Hold the deck in the left hand dealer’s grip with right hand above in Deep Overhand Grip. With the right thumb, riffle up the back of the deck and break it at about the half-way point.
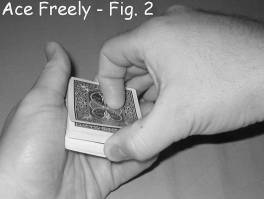
Get a left pinky break at this point. Basically, all you’ve done thus far is gotten a left little pinky break in the middle of the deck. You are about to pick up the top half of the deck (above the break) with your right hand, but as you do, your left thumb will place pressure on the top card of the deck.
While you pull the top half up and out, the top card will slip down onto the bottom half of the deck (see fig. 4).
Once the top half clears the deck, the top card will fall flat on the bottom half, however, your mission – should you chose to accept it, and you will – is to prevent that card from falling flush with the other cards. You will actually catch a left pinky break below it. Then you will drop the right hand’s packet onto the left hand’s packet.
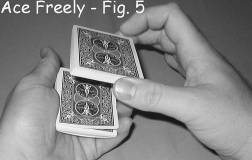
Figure five shows the situation just before you drop the right hand’s packet onto the left hand’s packet.
Once you’ve completed this, you will have a break in the middle of the deck directly below what used to be the top card. Trust me; you’ll need to be able to do this in a minute.
Braue Reversal:
This is Fred Braue’s move that is a great way to get a card reversed in the middle of the deck right under the spectator’s nose, which is kind of disgusting if you think about it.
This move is very similar to the double undercut described earlier… you DID read it right? Fine… go back and read it… I’ll wait… no really… it’s ok… I’ll wait. Thank you; now don’t skip any more of the directions or you’ll have to go in time out.
Here’s the deal: hold the deck in the left hand’s dealer grip and right hand Deep Overhand Grip. Get a thumb break beneath the top card. This is the card that will end up reversed.
Riffle up the back of the deck and break it in half as if you are about to do a double undercut, and you are, but slightly different. With your left hand, take the bottom half of the deck (the part that is below the break) and turn it face-up on top of the deck (on top of the card that you are holding a thumb break beneath).
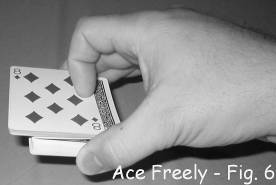
Figure six shows this with the face-up cards jogged to the left for clarity. In actual performance, you will square the cards flush. Notice, however, that you are still holding a break beneath that former top card.
Now the situation is that you have a block of face-up cards; below that is a face-down card which used to be the top card. You then have a thumb break, followed by the rest of the deck face-down. Take the part of the deck from the bottom (below the break) with your left hand and turn it face-up and replace it on the bottom of the deck. You can let go of your break now. You have just sandwiched the former top card face-down into a face-up deck.
Note About Double Undercut, Slip Cut, And Braue Reversal:
Notice that the above three moves are techniques that alter the state or location of the top card of the deck. The first move (double undercut) moves the top card to the bottom.
The second move (slip cut) moves the top card to the middle of the deck, and the Braue Reversal moves the top card to the middle of the deck and reverses it. Notice, also, that the rest of the deck’s order does not change when performing these moves. These moves are the bulk of the effect. This is where all the work is done.
Brad Gordon’s B’lip:
This is probably the best color change I’ve ever seen. A card is shown, and in the blink of an eye it changes visibly and instantly to another card. Having said that, I feel kind of dirty not using this move the way Brad intended it to be used.
It’s used in a more subtle way for this effect. Here’s the description of the Blip the way it was intended: Hold the deck in the left hand dealer’s grip. Turn the top card face-up. As you do, get a left pinky break beneath the second card. The position is that you have the deck in the left hand, and you are holding a left pinky break beneath two cards which are back-to-back. With the right hand, pick up the double from the outer right corners. As you do so, arch the cards (remember, the audience thinks this is one face-up card, not two back-to-back cards).
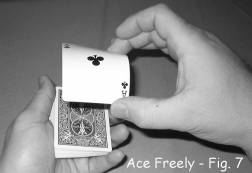
Figure seven shows the arch. Hold the arched double above the deck about four or five inches.
Now here comes the knacky part: quickly open the right hand releasing the pressure on the double. The cards will fall to the deck, but they will flip over sideways like a book, and by the time they land on the deck, the other card from the double will be showing.
This makes for a killer color change. The move is basically a squeeze-then-release-thing. It takes some practice to get the feel, but it’s fairly simple. You’ll like doing this move; it’s brilliant.
Here’s the dirty part. I told you I kind of use it for a different purpose. You’ll notice that when you do the move, the double stays together pretty well and remains undetected. I take advantage of this and use the move as a way to show a double lift as being only one card.
I turn over my double as you normally would a double (not a back-to-back). Then, I pick up the double with the face upward and execute the Blip. The result is the double flying down to the deck and turning face-down to match with the rest of the deck.
This creates the illusion of carelessly tossing a single card from your right hand to the awaiting deck of cards. We’ll be using that in a minute as well. Hang in there; we’re almost to the routine.
The Anti-Vanish:
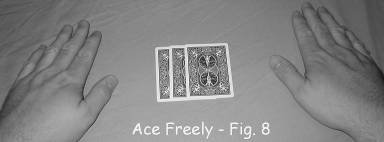
The last move you need is my Anti-Vanish. This idea has to be in print somewhere, but I’ve never found it, so here it is: Place four cards in a pile on the table face-down (audience thinks it’s only three cards). Place your right hand on top of them to cover them completely. Now if you put pressure on the cards and spread to the right, the bottom three cards will spread, but the fourth (top) card will move with your hand to the right and remain concealed. Move your hand over to the right, and place your left hand to the left of the packet in the same manner as the right hand. In the Figure 8, the fourth card is concealed under my right hand.
Now if you tilt your right hand to the right ever so slightly, the card underneath will kind of pop up at a slight angle. Figure nine shows an exaggeration of this position.
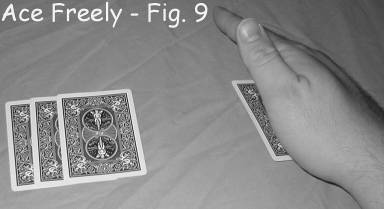
You’ll need to use a close-up pad for the card to pop up the right way. Also, note that when you do this, the audience should never see the card under your right hand. They should be completely unaware of its existence.
Now all that is left is to move the right hand to the left and the left hand to the right. As you do this, your right hand’s card will go on top of the three spread cards.
This happens right about when your left hand is over your right hand. When you get to that point, spread your fingers wide open on both hands and immediately move them back to where they were (right hand to the right, and left hand to the right). When this is done properly, you will be in a position that looks like figure ten.
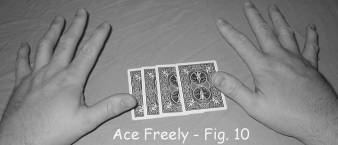
It will seem as if the fourth card appeared right on top of the three spread cards. This is quite a freaky illusion if you do it right. Just practice it a lot before doing it for anyone.
Routine:
Ok, let’s see if we can put all of this together. The above section was to get you familiar with all the necessary tools to perform the mechanics of the effect. Below, I will show you how to put the pieces together, but you will still need to work on your script. Make sure you really know the above moves well before you move on.
Step One:
In this step, we will get the four Aces on top of the deck in this order, from the top down: two red Aces, The Ace of Clubs, then The Ace of Spades. You can either do this before you start your performance or you can do it right in front of them. I usually just do it while they’re watching. It only takes a couple of seconds.
Step Two:
Now we need to distribute these Aces for our first production, so double under cut the top Ace to the bottom. This will leave the deck in this order, from the top down: Red Ace, Ace of Clubs, Ace of Spades, the whole deck, Red Ace. Next, slip cut the top Ace (red) to the center, but hold a break below it.
Now you should have this order: Ace of Clubs, Ace of Spades, half of the deck, Red Ace, right thumb break (or left pinky break – whichever you prefer), half of the deck, Red Ace. You can hold this situation in your left hand as you address the audience and gesture. It only takes a second to get to this position.
Step Three:
We are now going to reveal the first two Aces (red and red). We will use the Braue Reversal for this. While holding the left pinky break below the red Ace in the center, bring the right hand over and hold the deck in Deep Overhand Grip.
You will get a right thumb break above the top card (Ace of Clubs). Now you have two breaks and your situation is as follows: Ace of Clubs, right thumb break, Ace of Spades, half of the deck, Red Ace, left pinky break, rest of the deck, Red Ace. With the left hand, remove all of the cards below the pinky break and place them face-up on top of the deck this will reveal a Red Ace.
Next, take the cards below the thumb break and turn them face-up and replace them on the bottom, but leave them jogged to the left (see fig. 11).
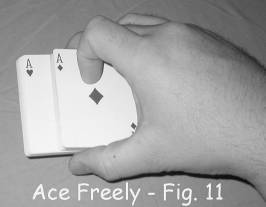
You will now be holding no breaks, and you will be showing the two red Aces. Now remove the one from the center of the pack; place it face-up on the table, and square up the cards. Next remove the other red Ace from the face and place it on top of the one on the table.
Step Four:
Here is where we reveal the third Ace. Turn the deck face-down and spread the cards below the two red Aces, and the Ace of Clubs will be face-up in the center of the pack (see fig. 12).
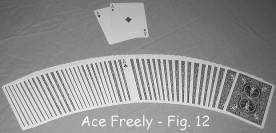
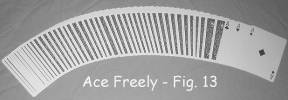
Remove it, and place it face-up on the right end of the spread. Place the other two red Aces there as well (see fig. 13).
As you square up the cards, get a break below the fourth card from the top (The Ace of Spades). Immediately table the deck face-up with the left hand as the right picks up all four cards (audience thinks it’s only three). Ask the spectator to hold the deck for you.
Step Five:
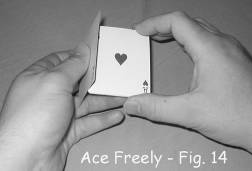
Next, we need to really drive home the fact (?) that you are only holding three cards (even though it’s four). The spectator is holding the deck at this point. You have three Aces face-up in your right hand with The Ace of Spades face-down below them.
Hold them by their right edges. With the left thumb, peel off the top face-up Ace and revolve it around to the bottom of the packet as you say the name of the Ace (see fig. 14).
You will repeat this with the other two face-up Aces. At this point, most people will believe that there are only three cards, but you want to really eliminate the possibility of them thinking you had four, so that the next part is as powerful as possible. Here’s how you really convince them that you only have three cards. Turn the packet face-up. This will show The Ace of Clubs.
Peel it off and flip it face-down into the left hand. Peel off the second card (A Red Ace) the same way, leaving it face-down on top of the Ace of Clubs in your left hand. You are now left with a double in your right hand. The card showing is the other Red Ace. You will now execute Brad Gordon’s Blip. This will launch the card and turn it face-down landing on top of the two cards in the left hand. This really makes the spectators believe that you only had three cards.
Step Six:
This is the revelation of the fourth Ace. If you’ve followed everything I’ve said so far, you should have the four Aces in your left hand face-down (the audience believes it’s only three). The top Ace is the Ace of Spades. If this is not the situation you are in, go to your room, and don’t eat any supper.
Tomorrow, try again. Are you still here? Ok great. Now what you need to do is drop the three (?) cards onto the table in a pile and execute my Anti-Vanish Move exactly as described above. This will cause the fourth Ace to appear right in front of their eyes. Turn over all four cards to show them.
Presentation:
Here is the performance from the audience’s perspective. I’ll note the actions in parenthesis: For this effect, we need the four Aces. I can find them by cutting (Do Step Two). But I’ll show you a more flashy way (Do Step Three).
There’s Ace number one and Ace number two (remove red Aces and place on table). For the third one, all I have to do is snap my fingers, and it turns over (turn over and spread). There’s the Ace of Clubs (place on top of spread), Ace of Hearts, and Ace of Diamonds (place on top of Ace of Clubs).
I’ll take the three Aces; you take the deck (give deck to spectator or table it as you keep the three (?) Aces with your right hand). Here they are, one, two, three Aces (pivot each under packet; then turn packet face-up). That’s the Ace of Clubs (turn face-down into left hand), the Ace of Hearts (turn face-down into left hand), and the Ace of Diamonds (do the Blip).
The only one missing is the big one, The Ace of Spades (drop cards to table in a pile). Here are the three (spread, concealing the fourth Ace). All I have to do to make the fourth one leave the deck is wave my hands over these three (do The Anti-Vanish), and the Ace of Spades appears (turn over all four cards to show the Aces; then go into a four Ace routine).
Notes:
The above presentation was not an attempt to give you words to say during your presentation of this effect. It was an attempt to give you a flow of how the effect will be performed. You will need to use your own script. Master the mechanics first; then work on creating a presentation that works for you.
Also, remember, this is a four Ace production, so once you’ve produced the Aces, you’ll need to do something with them. Do a four Ace routine. Also, you may have noticed that there is no figure three… don’t panic, it’s been removed on purpose.
This is an awesome effect on lay people and many magicians. Each of the moves described in this effect are merely tools in the magicians tool belt. Use them for this effect, but don’t be afraid to experiment.
Use them to inspire your own routines, or use them to enhance effects that you already do. However, make sure you practice these moves, and please, for the sake of the *Art of Astonishment, don’t ruin it by performing it prematurely.
Oh if you were wondering how I knew that your top card was a Five of Spades, you have been scammed. If you are not wondering how I knew your top card was a Five of Spades, it’s because your top card wasn’t a Five of Spades.
However, for those of you who happened to be the lucky 1 in 52 who did have the Five of Spades on top, well… you thought I was psychic. Chalk it up to luck, but I astonished you! Remember that feeling. That’s what we’re trying to instill in our audience.